Friday, June 6

How to Crochet Into that Third Loop or Lower Horizontal Bar of Single Crochets

The moral of the story is, if you think you're looking
at the tops of stitches, you probably are
. Orbit Cowl
The third loop is required for "camel crochet." It has also been called the humpbump, nublower loop, back-back loop, and lower horizontal bar of the single crochet (sc in the US; double crochet or dc in the UK and Australia). The patterns that result from using this loop in different ways have been called Savvy Single Crochet, and Camel Crochet™. 


Pallas Scarf uses a few kinds of third loop
stitches. Its prominent top loops give this
design a strong impact.
I've listed these alternate names first so that crocheters searching for help have a chance of finding this post! For some reason this loop - a simple part of a simple stitch - is ignored in the crochet how-to books. (Be sure to see the end of this post for a chronological list of books that mention this topic somehow, and some how-to videos!)

It's not that I think beginners need to launch right into using it, but if it were named in a diagram along with other stitchy bits, it would give newbies a stronger foundation for broadening their understanding later. We'd have a common language. Designers wouldn't think twice before using it.

Here's how to find the loop in sc and use it. (Scroll down for hdc.) I've used it in a few of my patterns and want to use it more without confusing people. 
Single crochet stitches. This is a close up of the next photo below. I tinted the third
horizontal loop of the single crochets. The copper needle point is inserted through the
loop from under it, just like you'd do with the crochet hook for a nice ribbed look.

1. Loosely crochet a row of some sc. You already know about the two top loops of a sc, right? They're the ones you crochet the next row of stitches into (unless directed otherwise). The top loop nearest to you is the front loop and the other is the back loop. These loops are labeled consistently in the books.

2. While you're crocheting each sc, you see the front of it. Look closely at how different the back is from the front of the stitch. The main difference is a small horizontal bump strand on the back only, just under the top loop.
The fronts of the dark blue rows are facing us, and their top loops are bent over toward us, because the light blue rows were crocheted into this third loops. We're looking at the tops of their heads.
I crocheted the dark blue rows into both top loops of the light blue sc.

Issue #61 of Crochet
Inspirations Newsletter
Not only can you crochet into that third lower bump loop, you shouldFor more on the uses and possibilities of this third loop, please see issue #61, "Top Loops Optional," of Vashti's Crochet Inspirations Newsletter.

3. Finish your first row, chain 1, turn. Now the backs of the first row stitches are facing you. Look again for the third horizontal loop of the stitches. Skip the first sc and insert your crochet hook in the third loop of the next sc, from under the loop (not down through the top), then yarn over and pull through the loop. You should have two loops on your hook. Yarn over again and pull through both loops to complete a sc. 
Ever wondered if third loops are used
for the Thirsty Twists Bathmat?
Yes, but not as many as you think.


Three Tips!

It's weird and slow to crochet into this loop at first, but like everything, it gets easier. (I've only used the stitch in small strategic areas of my designs for effect.)

1. Keep stitches loose; use a larger crochet hook.

2. Use a pointy-headed crochet hook. You can even file the head of some of them to customize it.

3. Try this: when you pull up a loop in that third loop and leave it on your hook, pull up on it a bit. I've seen some people make their sc with their hook at an angle - angled toward the beginning of the row (held more horizontally than vertically). This makes a slightly stretched, taller sc with a loosened third loop, making it easier to crochet into.

The key to the effect is that none of the top loops of the first row are covered by stitches in the next row, so they ride along the surface as a neat chained-looking ridge.


Now for the Half Double Crochet (Hdc)
I hear some of you saying, "I do this already with hdc to make a squishy hdc ribbing!" And crocheting into the third loop of hdc is more common (though not as common as you'd think, if the crochet stitch guides are any indication). It's also easier because the third loop of hdc is looser.
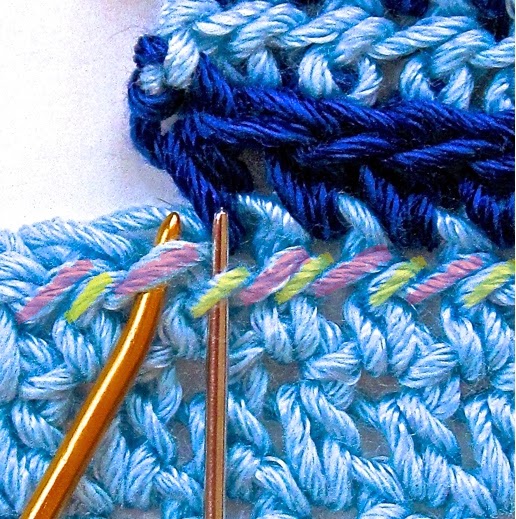
These are all hdc. I color-coded the two different kinds of "third loops."
The only one I've used in designs, and have seen others use, is tinted pink.
The lemon-tinted one is worth trying, though. It makes a rib that's less offset
and bent. It's structurally the same as the sc third loop.
Interestingly, that hdc third loop is anatomically different from the sc third loop. (See newsletter #61 about this.) 

I checked about 30 likely books for any explanation of this third loop of sc and/or hdc. Here's a chronological list of the what I turned up. 


If you know of a source that is not on this list, please name it in the comments.
Note: some book titles are Amazon Affiliate links. If you click on them, it helps me out a little. Thanks!

1975: Golden Hands Special #40; Aran Crochet chapter, "Crochet rib stitch: …*work 1sc into horizontal loop below top of the next sc*…" and "Aran rib" (a row of hdc in the back loop only alternates with a row of third loop hdc).

1981: Anne Rabun Ough, New Directions in Crochet; shallow sc on p. 60.

1983/1985: Pam Dawson, Complete Book of Crochet; p. 116 "Single Rib Pattern" with diagram, in "Aran Crochet" chapter. same instructions as in Golden Hands (1975).

1985/1986: Rhoda Ochser Goldberg, The New Crochet Dictionary; p. 114, "Aran Crochet" chapter: same introduction and instructions as in Golden Hands (1975). hmmm...

Third loop crochet tends to be dense and warm; rows of
all sc or hdc in the top loops are too. This speedier third-loop
fabric is a light, airy, stretchy exception. Half Circle Handbag.
1986 Denmark/1995 USA: Lis Paludan, Crochet: History and Technique; p. 233-235, "the loop behind the stitch" and "hook inserted into the little loop under the stitch," with a nice diagram. Two swatches: sc in third loop only with turning, and in the round with no turning. (Interweave Press; out of print)

1990+: Naka Pillman, Camel Crochet™ Basic Instruction Book (and others in the series).

2007: Bendy Carter, Single Crochet from A to Z Sampler Afghan™; pp. 6, 10, 13, 17. Three kinds of fabrics using this loop called "horizontal bar." (Annie's Attic/DRG.)

2007: Helen Jordan, Stitch Collection: Textured Crochet, see p.54-57; "Inserting your hook into different parts of the stitch, when working half double crochet makes quite a difference to the surface of your work."

2008: Karen Whooley, Savvy Single Crochet. (Annie's Attic/DRG.)

2010: Karen Manthey, Crocheting for Dummies; in "Creating Texture in Unexpected Ways," I love the symbols given for the top front loop, top back loop, lower front loop, and lower back loop! States a "back-most loop" can be crocheted into for half double crochets and taller stitches.

2011: Robyn Chachula, Crochet Stitches Visual Encyclopedia; Pattern for "Middle Bar Half Double Crochet." "The middle bar is below the top two loops." "Tip: You can crochet in the middle bar of any stitch taller than half double crochet."

Videos and Recommended Webpages:
------------------------

Karen Whooley's Savvy Single video. Link starts approx. 2 minutes in, when Karen has completed a row of the usual traditional single crochet stitch. She then goes on to show how to do the next row of single crochet in the third loop.
Kim Guzman's information page; includes videos.
Follow the tweets of Camel Crochet.


Camel Crochet video by Bob Wilson.

------------------------

Friday, February 28

Crocheting Into Foundation Chains (& Other Chain Stitches)

Crocheting into Chain Stitches: Six Options
Crochet is all about options. 
I learned only one way to crochet Row 1 into the foundation chains back when I learned how to crochet. I didn't question it for years! 

Nowadays, when a project requires foundation chains instead of a thicker, stretchier alternative, I choose to crochet into the chains different ways. In my crochet patterns I specify how when it matters. 


Usually when I need to specify which chain loop to crochet into, it's the bottom "bump" loop (see the top grey swatch at right). This is the loop that you need to use when doing:


Update, Mar. 15 2014: Crochet Inspirations Newsletter issue #58 takes this topic further.


Chain Stitch Anatomy 101
Each chain has three loops.
  1. Front Top Loop: the one closest to you as you're about to crochet into it.
  2. Back Top Loop: the one farther from you, but still the top part of the chain.
  3. Bottom Bump Loop: Turn the chain over to see the third strand on the bottom. It looks different, like a small bump between the two top loops.
Three Loops of a Crochet Chain Stitch: Anatomy Lesson
When the crochet hook pulls "A" through loop "B-C", 
a loose chain will be completed. The B and C strands
will form the two top loops of the chain. The strand 
will be the bottom bump loop of the chain. (This image 
also shows the first step in crocheting a love knot.)

You can crochet a stitch into any one or two of these loops. This is how you get the six conventional ways shown in the six swatches in the upper image (i.e., insert hook under X loop or loops of the chain, yarn over and pull yarn through). Next I'll compare four of the six options.


Four Ways to Crochet Into Foundation Chains

Starpath Scarf: a new downloadable crochet pattern by Vashti Braha
Option 1 gives the Starpath Scarf nice edges.
Option #1, The "bottom bump loop" only (grey swatch above) 
This one gives me my favorite finished edge. It's a popular option for those in the know. Neither top loop is used, so they show completely along the finished edge. It creates the same lovely chain-loop look as the other finished edge; in other words, the bottom edge of the first row looks the same as the top edge of the last row. Makes an edging optional, and makes seaming a pleasure.

Option #1 firms up the foundation chain (fch) more than crocheting into a top loop, so depending on the project, I make my chains a bit looser. I don't find it to be more difficult to do; the challenge is in the pattern writing! 

I feel that not enough crocheters notice this third bottom "bump" strand of chain stitches. Even if they do, the term for that loop is not as standardized and well known. This is the main reason I wrote this blog post.


Option #2. The top two loops (blue swatch above) 
This is the way I was originally taught - under both of the top loops of the chain. It results in a finished edge of little "bump" loops because the bottom bump loop of each chain is the only loop that's not included in the next row of stitches. This option tightens up a foundation chain the most. The big reason I would choose this is if I wish to effortlessly unzip the foundation chain later (if done as described in the Burly Bias pattern). Another reason would be if I'm crocheting beads into the fchs.

Flounce Charms: Option #1 required
for their Fat-Free Picots
It makes sense to teach this option to a beginner. The top two loops of a chain stitch actually resemble a chain link, and other crochet stitches have two familiar top loops like chain stitches. Finding the front top loop (FL) or back top loop (BL) of a crochet stitch is a common occurrence for a crocheter, which makes the names for these loop familiar.

Option #3. Two other loops (the top back loop + the "bottom bump" loop, green swatch above) 
I've met some crocheters who prefer this option because It's the recommended option in most of the how-to books, often as an improvement over Option #4. It's a bit firmer and neater looking than #4, and a bit easier than #2. 

Option #4. One top loop (orange swatch): Some beginners are taught to crochet into only one top loop, which is actually thtop back loop (abbreviated BL in patterns; or BLO which means "back loop only"). Crocheting into this loop of a fch is helpful for beginners, because it's easier to fish around for only one of the three loops of every chain, especially the BL—it sticks up a bit more than the other top loop (the FL). Another benefit is that the fch firms up less. It's the most discouraged option in the how-to books, though, because it can have a stringy, loopy, or messy look.

Option #4 is used for the Luckyslip Mitts.

I use this option sometimes if I'm crocheting slip stitch ribbing that I'll be seaming with slip stitches later; and sometimes when I crochet rows on both sides of the foundation chain.

Aside from my first choice (Option #1), I also like the rarely used top front loop only - the pink swatch - instead of #2, #3, or #4. It has a stable finished feel, a flat back, and a cute nubby front.


No matter which option you choose, try to pick the same top loop(s) of every chain of the fch, or else the next chain may look weird and your finished edge look irregular.

Friday, November 30

Slip Stitch Crochet FAQ in My Classes

I've recently revised this post and created a permanent page for it at my new website.
These are the questions I most often answer in slip stitch crochet classes and by email in response to slip stitch patterns. See also issue #45 of my Crochet Inspirations Newsletter.

Q: “How much more yarn does slip stitching use?”

A: It seems to use LESS! When I’ve used the same yarn and crochet hook size to make the same-sized swatches of all slip stitch in the back loop [Bss], all single crochet in the back loop [blsc], and all slip stitch in the front loop [Fss], the blsc used the most yarn of all. The Fss used the least yarn of all

Q: “Why doesn't my slip stitch ribbing look ribbed?”

A: Some crocheters don’t see the ribs forming until they look along the row edges while stretching them apart. You need at least 10 rows, which will create 5 ribs. Until then, it might seem like nothing’s happening.
Eva's Ribs Scarf free downloadable pattern

The ss rib is so corrugated, or accordion-like, that sometimes students don't see the ribs and valleys even though they're there! (This is what makes it such a great ribbing when you wear it, especially with wool and wool blend yarns.) At rest, the ribbing is even more compressed and springy than sc in the back loop, because sc “bodies” stand independently of each other and make wider ribs than the ss bodies do. Ss bodies mesh together more both in height and in width. 

Q: “Why do my edges look uneven?"

A: Usually this is caused by accidentally increasing stitches, or decreasing them, or both. Placing a stitch marker in the first stitch of each new row is the best fix, because by the time you get to the end of each row, the end ss is usually partly covered by strands from the turning ch and is very easy to overlook. The result is a decrease. It can also be tempting to think the turning ch is another ss, but that would result in an increase
Another cause can be the turning chain. Once in awhile a student’s turning chains look loose and kind of messy along the sides of rows. The easy fix is to crochet a tighter turning chain. Some slip stitchers omit the turning chain altogether. If you do this, be sure to use stitch markers to keep the end slip stitch from melting away even more.

Q: “My foundation chain looks loose, and each row is getting tighter. I have the right number of stitches so why does it look like I'm missing some?”

A: Does your swatch feel stiff, and do you struggle to get your hook into the back loop of the next stitch? If so, then the stitches really are too tight. A common problem is when the stitches feel a bit too tight to crochet into, some crocheters reach for a smaller crochet hook to make it easier. This is the worst thing you can do. Instead, focus on making each stitch looser. The two top loops of the stitch should have a large enough space between them to fit the size of the hook you're using. (This is what I call "hook-led gauge" and is an intermediate skill that is worth learning for all kinds of crochet.)

Q: “I’ve tried everything so why are my slip stitches still too tight?”

A: Sometimes a crocheter is careful to make a loose ss, but then after s/he makes the NEXT ss, the previous loose one is tight! When this happens, the yarn is being pulled from the completed stitch while the next ss is being formed. This habit doesn't affect other crochet stitches as much, but ss are closely interlocked, so it's easy to affect nearby stitches.
For some people, making a slip stitch in two steps helps: 1) insert hook in stitch, yarn over and pull loop through stitch; pause, then 2) pull that loop through the other loop on your hook to complete the slip stitch. 
This tip tends to help long term crocheters who are deeply habituated to making their slip stitches (ss) quickly and tightly.

Q: “Why am I having so much trouble knowing which is the back loop?”

A: Slip stitches tilt away from you as you crochet them in rows. This causes their front loops to stick up in the air, tempting you to crochet into them. The back loops fall lower to the back of the row. Some crocheters overcompensate and look too far back for the back loop, and choose a loop from the row below instead. 

Q: “It isn’t stretchy. It doesn’t really seem like ribbing. Am I doing it wrong?”

A: The most common cause is choosing the wrong loop as the back loop. If you're choosing a loop from the row below instead, you'll make a thicker, less stretchy, less ribbed fabric. Understandably, some new slip stitchers accidentally crochet into that tempting front loop sometimes, instead of in the back loop. Rows of Fss are less stretchy and are not ribbed. Occasionally a crocheter mixes some sc in with their Bss or Fss. This tends to happen when crocheting ss with a two-step method (as if crocheting a sc, but without the final yarn over. The pause before completing the ss helps some crocheters keep their ss loose enough.)

Q: “Should I change to a smaller hook? Then I’d be able to crochet into the back loops easier and faster.”

A: No. Resist the temptation! A smaller hook would not solve the problem of crocheting ss tightly. If the back loop of a ss is too tight for the hook you’re using, it means you’re not using the hook size as a guide to how big (loose) your stitches should be. Some crocheters are accustomed to using the yarn instead of the hook size as their guide for how tightly they crochet.

Q: “What happens if you do a row of Bss and then a row of Fss (slip stitch in the front loop)?”

A: Try it! 
Beaded Slip Swoop Loop

Q: “Does it matter if I chain 1 when beginning a new row? Does it matter which way I turn?”

A: Sometimes it matters a lot, or a little, or not much at all. It depends on the crocheter and the project. I teach all slip stitch newbies to chain 1, and to be consistent about turning the same direction each time. Both of these habits help to make the last slip stitch of each row easier to recognize. I personally prefer to turn so that the yarn is at the back of my hook instead of front. 

In designs, I almost always use turning chains because I like the extra drape. See this newsletter issue: "Crochet That Pours". Undaria and Slip Swoop have 2 or 3 turning chains! 

Q: “How would I change the width of the Slip Slope Scarf?”

A: The short answer is that this would require a redesign. Many crocheters could figure out how to do this, using the Slip Slope free pattern as a guide. The best thing to do is to crochet 2 complete short row “wedges” of Slip Slope. After that, not only will you have a swatch of how wide your scarf would come out if you change nothing as a starting point, you’ll also understand the simple system of short rows, and can then try your own variations. You could simply add or subtract a stitch repeat; or you could also shorten each short row more gradually, or less, to create wedges of different sloping angles.

Q: “Does slip stitch ribbing get any easier/faster?”

A: Yes! It’s faster than knitting. It’s as fast, or a bit slower than sc ribbing, depending on the crocheter. Fss is faster than Bss. All tighter ss is slower than all looser ss. 

Some ways to improve speed: 
- Focus on the unique rhythm of slip stitching. 
- Make the ss in ONE step instead of two for a swift, fluid motion. (Make sure your ss are consistently loose first.)
- Use a pointy-headed crochet hook. You may need to customize your crochet hook by filing the head of it.

Some ways to increase fun:
- Use bulky yarn for quick projects
- Listen to audiobooks and podcasts
- Add a pinch of stitch 'spice': change colors; short rows; use a fun or luxe yarn; mix different sts; add beads!

Tuesday, January 31

How to Crochet Spiky Puff Stitches

I used a different color per row for the how-to crochet stitch video below!
The Spiky Puff Stitch is what puts the 'palmetto' in the Palmetto Wristcuff! Don't the stitches look sort of like palm fronds? Also, the way the spike stitches point upward in the new pink one, looks like aloe vera plants to me. (The Palmetto Wristcuff pattern is one of many crochet jewelry patterns at my site and in Ravelry.)

I created a crochet stitch how-to video and uploaded it to Youtube today. I'm still practicing at making videos and it's not too bad! For my next trick I'm going to attempt to embed the video right here in this blog post.

If it doesn't work, here's the link to the video.

Sunday, October 30

Slip Stitch Short Rows: Basic Tutorial

The first row along the bottom is the longest (24 sts).
Each "row" or "rib" of slip stitches is really 2 rows.
The top row pair is the shortest (3 sts).
There's more than one way to crochet short rows. Click here: free crochet pattern -- for a scarf that uses the method that I'll describe here.


The stitch matters. I'm really enjoying using slip stitches worked in the back loop. It's also called "slip stitch rib" or "back loop slip stitch." I abbreviate it BLOslst. [2018 update: I've come to prefer Bss.]
Photo #2: This is what the other side looks like.

Each "rib" of this stitch looks like 1 row, but it's really a pair of rows.  I like starting with a long row pair and then making shorter and shorter row pairs. One benefit is that the foundation row stays straighter this way.
Photo #3: two "wedges" of stacked short rows.


When you start with longer rows and then crochet shorter rows onto them, the ends of the short row look like a slope of bumps. (See top two photos.)

At my other blog you can see what it looks like when you crochet a long row into the ends of the short rows. 
Photo #4: Slip Slope Scarf in progress,
with stitch markers. The first 2 row pairs
of a new "wedge" show at the top. 
You can make them blend in or stand out. 


Either way, they flex, drape, and stretch nicely when you use this stitch and a larger crochet hook. Here I'm using a 6.5mm hook (K/US10.5) with worsted weight wool yarn (a.k.a. "#4 Medium Weight" or "Aran" or "Afghan weight").


Starting with a long row pair and then making each row pair shorter and shorter results in a wedge shape. Notice that each wedge has a sloping side and a straight side. 


Photo #5: One more BLOslst in that last
marked stitch will complete this row.
In the third photo, a second wedge is stacked onto the slope of the first wedge. If this rib stitch didn't look almost identical on both sides, it would be easier to see in this photo that the back of the first wedge is facing and the front of the second one is facing in this third photo.

Now for some impromptu iPhone photos while I finish the Slip Slope Scarf. 

You might not need stitch markers at all. 


Photo #6: Row is now complete. Ch 1, turn.
I've added them in these photos because in the pattern I recommend them to people who haven't done much slip stitch crochet just until they can easily recognize the last stitch of every row. 
(Just add a marker to the front loop of the first BLOslst you make in each new row. It's worth the trouble, I promise.)

In photos #5 and 6, I want you to compare how it looks when you have one stitch left to work into at the end of a row along the straight side of the wedge.


#7: New row begun. 
In photo #7, I chained 1 and turned, and then worked a BLOslst in each of the first four slip stitches. I placed a marker in the front loop of the first slip stitch of this new row. This row will be shorter; see photo #8.

Photo #9 gives you a bigger picture of how the sloped side is developing, while along the left is a straight edge--the stitches are only decreased when you reach the sloping edge. Make sense?


#8: I've worked across the new row to the last 3 slip
stitches of it. I'm going to ch 1 and turn,
leaving those last 3 unworked.
Photos #10 & 11 give another big picture: the current wedge has been completed: the last row pair has only 3 stitches in it!


#9: I chained 1 and turned, leaving the last 3 of the
stitches unworked. In this photo I've already crocheted
2 BLOslsts of this new row, and marked the first one.
And finally, photo #12 shows you how the stitch marker come in handy when you crochet a long row to begin another wedge. 


#10: A completed wedge. 
Actually, I think most people will not need the markers for this because you know you need to find three stitches to work into as you do the long row, and I think this makes them easy to find. But perhaps the markers help point out the stitches, making the photos easier to understand?

🚀This Slip Slope pattern was an exciting discovery that ended up catapulting me into a whole series of slip stitch crochet designs and classes!
❤️❤️❤️❤️❤️


#11: Reverse side of photo #9.
#12: Long row of next wedge has been
crocheted into each of the 3 unworked stitches of every short row.